 |
| Photo courtesy of Miss Cushla Little- Sister <3 |
Admit it, you love it when I babble and take ages getting to the point. I tend to go off on tangents a lot. I'll start saying one thing and go off onto a completely different topic because something I said in what I was originally saying then reminded me of something that made me start this new topic that I am now going off on a new tangent with. You following me... on my tangent? Hey, I've just done it again. I did not intend to talk about my tangents, I was going to say how it really annoys Cushla and mama, and possibly even the dog?
But they deal with it because what I say is sometimes interesting, but most of the time Cushla says I talk purely to make noise. Sometimes It isn't even English. It is just a string of syllables that I've put together for some bazaar reason to fill the deafening silence.
What's that you say? Get on with it? :)
This recipe, I found on the BBC Website on Good Food. Just assume that most of the stuff I bake, will be off the BBC website. It doesn't take a long time to bake, it just takes a little (see there is that sad sad attempt at playing with words again) time to measure out all of the ingredients.

Never in the past did I measure out all the ingredients completely before even starting to bake whatever it was that I was baking. But you know what, it really does save a lot of time. I'm not running from one counter to the other to get this and that, which really should have been put in immediately after some other ingredient. I guess it doesn't make that much of a difference, except from the possibility of me bashing into mama, Cushla or Toffee is significantly less. You never realise how small the kitchen is (even when it's not at all) until someone is in your space and always there when you turn around. I need enough space to run round and not have to factor in someone else. When I cook, I have a monopoly on the space in the kitchen. People just know not to come in. It's better for everyone in the sweetest way possible.

Okay, the ingredients for the fudge cake are;
- 175g Self- raising flour
- 2 Tbsp (Tablespoons) Cocoa Powder, I used Cadbury's hot chocolate powder ( Twist #1)
- 1 Tsp (Teaspoon) Bicarbonate of Soda
- 150g Caster Sugar
- 2 Eggs
-150ml Sunflower oil, I used 150g melted butter. A) I love butter. B) Butter tastes better. C) I had no sunflower oil (Twist #2)
-150ml Milk- the recipe says semi- skimmed, but whatever you have lying around is grand sure (If you don't have a measuring jug, only scales, I find that when I measure out liquids on the scales, it makes no difference whatsoever if you use the grams option.)
- 2 Tbsp Golden Syrup, I used Maple Syrup. A) I prefer the taste. B) I had no Golden Syrup. (Twist #3)
- 1 Tbsp of instant coffee powder. I've heard a lot about if you add coffee to something, it'll make it taste even more chocolaty. (Twist #4)
Buttercream:
Recipe Version:
- 75g Unsalted butter
-175g Icing sugar
- 3 Tbsp Cocoa powder
- Drop of Milk
vs
My version of the buttercream:
- Enough butter to fill the required amount of buttercream you think is appropriate for the size of your cake, factoring in that you'll be adding icing sugar. I used around 150g as I needed more icing.
- Sprinkle in the icing sugar gradually to the butter and keep testing the taste after each combination. Stop adding when you cannot taste the butter anymore. You know that butter taste, kinda buttery funnily enough. I stop adding the icing sugar when that taste goes away. Not too sweet, but not too buttery in the sense that when you eat it you feel like you are eating pure butter.
- Half cocoa powder, around 1 Tbsp and half melted chocolate. I used around half a block of dark chocolate melted : 10 Large Milk Chocolate buttons melted. Mix that into the butter cream with a little warm water to help it become silky and smooth.
See which one you prefer. (twist #5)

Pre-heat the oven to 180C and bake for 15 or so minutes. Really this again depends on your oven and your batter. But what you want to look out for is an even, toasty warm colour that obviously isn't raw and is coming away from the sides. If it bounces back from when you touch it it is ready. If a skewer comes out clean it is ready. If it smells gloriously yummy scrummy dum dum it is most likely done. If not then, there is something wrong with your nose and what it is smelling. Lol.
It is probably best to butter and line you tins before starting anything. This and preheating the oven. If your oven is anything like mine, it will take an absolute age to preheat. So better to have something like making the batter to occupy you when it is taking its sweet time preheating or you'll get bored and actually try and do the dishes.
You want to put the flour, cocoa powder, coffee, bicarbonate of soda and sugar into a mixer and blitz them together. If or no other reason than to mess about for fun. Then add the wet ingredients. I added the eggs first and mixed them until the began to form a clump. To loosen this as I didn't want to be forming a cookie dough type mixture, I added the milk, maple syrup and butter. This really liquidised it. It looked like chocolate sauce and I had to fight there and then with my will power to not eat it all. Plus there were raw eggs in it anyway, so probably not the best idea. I actually added a little melted milk chocolate here as well in the actual batter.
Pour this evenly into the lined tins and pop into the oven for around 15 minutes or until they are golden brown and cooked through.

Take the cakes out of the oven and immediately take them out of their tins. Do this by flipping the tin over so it is facing the cooling rack and tap it on the tray to make the cake fall out. Do this for all of them and peel back the baking paper. Leave them to cool completely now. Don't worry, It isn't like you'll just be sitter there wanting to eat it, you have to make the buttercream.
To do this, chuck the butter and icing sugar into a bowl and mix until creamed together. I normally do this by putting the butter in, creaming it and then gradually adding the icing sugar a little at a time and tasting it. But today for some reason I didn't. I chucked it all in at once and boy was that a massive mistake. Icing sugar everywhere. I breathed in so much I was coughing. But not over the buttercream. Felt like that should be clarified.
So if you don't want everything coated in a layer of icing sugar, or coughing icing sugar out in little clouds, it would make someone walking in not knowing what was going on think you swallowed a piece of chalk and are coughing little chalk clouds (you know the kind of clouds of chalk like you were beating two chalk board thingy's together like in the Simpsons, I mean that kind of cloud), do the buttercream the way I normally do it and not how I did it today. Then again, you may have some way of your own of making the buttercream. So in that case you do it that way. Each to their own.
I was watching Ina (Barefoot Contessa) the other week and she was icing a cake. She used little squares of baking paper and put them under the cake, so that when she iced the cake, the spare icing would drop onto it and not the stand. Meaning that when it was done, she would take them away and have a neat stand, un-iced.
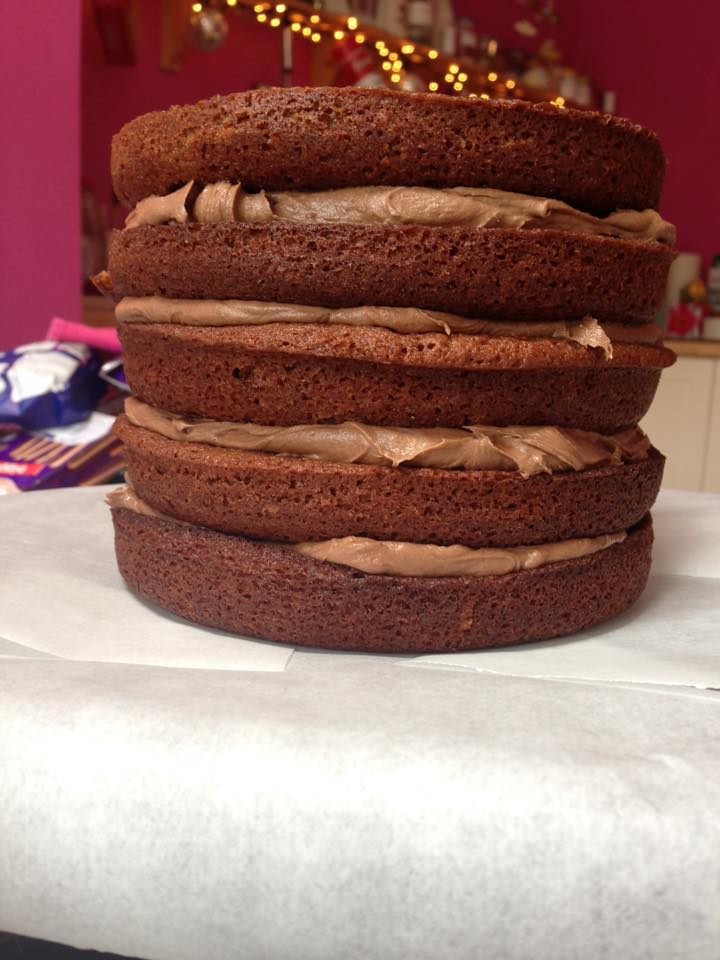
So place your first little cake onto the baking paper on your chosen stand. Plop a lot of icing onto it and spread it out evenly just before reaching the edge. Place another cake on top of that and repeat the process. Do this again and again until you have no cakes left. Once all the cakes are layered you need to ice the whole cake.
Get ready to ice the entire cake. To do this put a heap of icing on the top, like so much you think the cake might collapse from the center out. Then with a pallet knife or a knife, gradually spread the icing out towards the edges. I used a rocking motion to do this with my pallet knife.

Have you reached the edge yet? Good good, now we ice the edges. To do this you want to take the left over icing on the top of the cake and spread it downwards and then get more icing from the bowl and begin to spread it evenly onto the sides to cover the cakes completely in icing- yum! Use the rocking motion again as this will help you use up as much icing as possible without either using too much icing, or tearing the cake in the process. That wouldn't be any good.
To get an even or evenish finish, run the pallet knife along the edge and gently scrape off the excess icing in an even motion and layer until the cake rim is even. Touch up where needed by adding or taking away icing. To do the top, run the pallet knife from the outside in to get an even finish.
Take away the paper base, by gently pulling it away, without taking the cake with you. :) That is the cake complete, unless you want to decorate it. I didn't, but if you want to you could do grated chocolate, or shavings of chocolate of whatever type. It really depends on your preference. Personally I'd use dark chocolate as it would stand out from the icing, but would also be in keeping with the flavours already used. I like white chocolate but wouldn't use it as it wasn't in the recipe and Cushla and mama despise the stuff.
 |
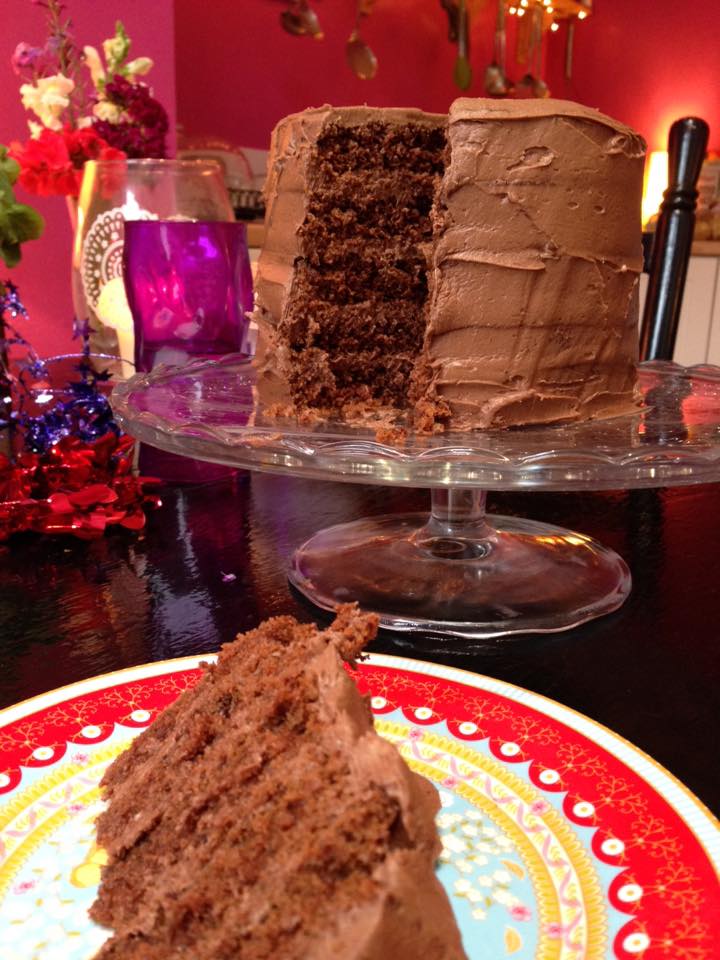
| Myself cutting the cake |
I think shavings of chocolate are really pretty and create a nice finish. Hannah, Cushla's friend from Uni and who has a great blog called Tolley Bakes- amazing btw- anyway, she did chocolate shavings and that is where I learnt to do them.
 |
| I was laughing at mama trying to light the sparkler :D |


No comments:
Post a Comment