Sunday 31 January 2016

Mini Ginger-nut Biscuits


A very warm welcome to you all!

I'm very pleased that whom ever you may be, that you have come back to read the ramblings that are within my mind. 

Today has been a wet, muggy day. Not too warm, but not exactly cold either. I was out driving with the madre for one part of the day, to then arrive home and remember that my sister wanted fizzy drinks. 

We then went out again, this time not with mama, but with Cรบshla. This was interesting, as she had never been out with me alone before. I am happy to say, it was successful. Now I am snuggled up on the sofa, eating freshly baked ginger biscuits and drinking the alcohol of my people- Guinness.

I don't add any of that blackcurrant shit either. Guinness is Guinness and shouldn't be messed with. It is perfect.

Back to the baking.

These biscuits are delicious. They're crunchy, crispy, gooey and full of glorious gingery goodness. 3 small nibbles and they're gone. Deliciously moreish.  

These would be great for any kind of gathering, as nibbles are always welcome to the party. They're not too big; making you feel like a right porker, but not too small to make you feel short- changed.

So if these look like they'd be up your alley, then pop onto Facebook and check out my Business Page- CVL Bakes and get an order for these bad boys! I'll price them for you, bake them for you and then deliver them for you! (Within Northern Ireland)

The ingredients that you will need for these little pieces of happiness are: (This dough makes around 40, 20g biscuits.)

This is a BBC Food recipe. With some Ciara modifications...

Ingredients:


- 340g Plain Flour
- 1tsp Bicarbonate of Soda
- 2 tsp Ground Ginger- I put 3 1/2 in
- 160g Light brown sugar

- 100g Butter
- 4 tbsp Golden Syrup
- 1 Beaten Egg- I didn't bother beating the egg, it's all going to the same, dark space inside my tum tum when it is all baked.

So, already I'm loving this recipe for two reasons;

1) It leaves room for adding in your own ideas and techniques
2) Nearly all the ingredients are ingredients that are staples in your kitchen

Making this an all round great wee recipe to bake whenever you have the urge, as I did today.


Method:

- Get a big bowl. A clean bowl. A worthy bowl. These biscuits are beautiful, so they deserve the best of crockery that you can muster up. 

- Chuck the flour, bicarb, ginger and sugar into the bowl and give it a quick mix around to mesh all the ingredients together.

- Add in the butter and you can either give this a mix with the mixer as well or use your fingers to partially rub the butter into the dry ingredients. This will make bread crumbs and lighten the mix.


- Add in the egg and then mix briefly and then the golden syrup.


- Switch in and out of medium and fast speeds on the mixer to bind the crumbs together into a smooth paste like dough. It should be light, fluffy and a soft texture and consistency. 


- Weigh little 20g pieces of the ginger dough and using your palms, roll into a relatively round shape. 


- Drop onto a baking tray that has been lined with baking paper and chuck into the pre-heated oven to bake.


Look at how light and fluffy the dough is. This is because it hasn't been over-handled with sweaty palms. Not that my hands are sweaty. Quite often actually they are cold and dead like- thanks to poor circulation to my hands and feet. But we'll get into that another time...


- Bake them for around 8 minutes until they are golden brown, slightly rippled with cracks and risen into little mounds.


- Take out of the oven when baked, slide the baking paper off the tray and either leave on the cooling rack on the paper or slide each one off the paper and onto a cooling rack using a pallet knife.

- Cool for 15 minutes and then enjoy!


These are delicious little bundles of pure enjoyment. 

Hope you enjoyed this?

Flip me, I love this baking lark! It is just so enjoyable!

Bye for now.

Ciara

Monday 18 January 2016

Valentines Day Treats


Good evening you lovely lot!

This morning I got up and ate breakfast. Now, those who know me well, will know I don't do breakfast. Yes, yes I know all about starting the day off right and kick starting your metabolism, but it just ain't me... My brain says 'eat!', my stomach say 'nah mate, call again in around 2-3 hours'. None of this has any relevance to what I baked or why I bake it. I just felt like sharing. Sharing is supposedly caring, as that purple... dinosaur told us? Suddenly couldn't remember as to whether Barney was a bear or a dinosaur...

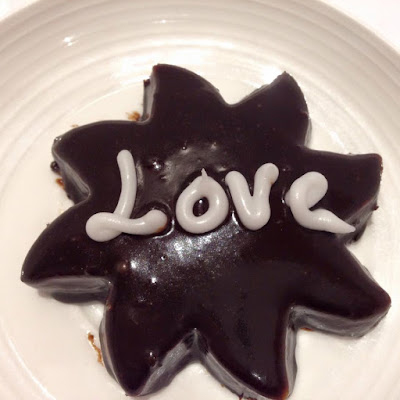
I had another creative urge today and wanted to test out some new ideas and techniques. So I baked shortbread, chocolate covered shortbread and mini chocolate cakes. Chocolate themed you could say.

My first reason for baking was to make something sweet with Valentines in mind. My second was to find an easier way to make fondant fancies. You see, my mini chocolate cakes are my own take on a fondant fancy. For I feel they are a slight faff to make in a small, home kitchen, like my own. What with the cutting into tiny equal sizes, then covering with buttercream all over and icing them. With large, industrial machines, sure it wouldn't be a bother now would it? But I have to make do with what I have. My method experiments with skipping the buttercream and simply dipping the individual cakes into thickened ganache.

So potter into the kitchen I did, to put on some 80's music and an apron and then I was ready to start. I started with the small cakes, as they baked for longer and at a higher temperature than the shortbread. Once the cake was baked (before cutting), I cooled it and popped the shortbread into the oven. Then made the ganache.

The equipment you'll need:

(1)
- 1 Rectangular cake tin
- Grease-proof paper
- Mixer or bowl and hand mixer
- Weighing scales
- Palette knife
- Skewer
- Cooling rack
- Knife
- Spatula
- Fork

(2)
- 2 Baking trays
- Cooling rack
- Grease-proof paper
- Star Cookie cutter, or whatever shape you wish
- Rolling pin
- Weighing scales
- Mixer or bowl and your hands

(3)
- 1 Pot
- Weighing scales
- Spatula

(4)
- Piping bag, fitted with a small tip, for piping writing


The ingredients you'll need are:


1) For the Cake:


- 220g Butter, soft enough to cream easily
- 220g Caster Sugar
- 4 Eggs
- 220g Self-Raising Flour
- 1 pack of Chocolate Chips, melted

2) For the Shortbread:


Every recipe changes and you might have a really good one.

I would recommend trying a few as I have, that is why I haven't listed ingredients.

3) For the Ganache:


300ml Double Cream
300g Dark Chocolate
10g Butter

4) Icing Writing:


- 100g Icing Sugar
- 4 tbsp Water (or enough to make a thick paste, that can be piped)


Method- Cake:

- Beat the butter in a mixer, until smooth and creamed. Once it has reached this stage, add the sugar and starting slowly, whisk in to create an airy and light mixture.


- Add in all the eggs at once and whisk on a high speed until frothy, light and pale.


- Dump in all the flour and chocolate and mix until a pale chocolate colour and there are no lumps left.


- Spread this evenly into the prepared cake tin and bake for 30-35 minutes at 170 C in a Fan Assisted oven (non-fan 190 C or Gas mark 5) but you know your appliances best, so you decide :) until golden brown, risen and fluffy. When you insert a skewer, it should come out clean, with no bits. Plus, I feel a good way to tell if the cake is done, is when you are inserting the skewer, can you feel it breaking through the crumbs that are beginning to form? If it is smooth and you can't feel anything against the skewer, it is most likely not done yet.


- Take this out of the oven and tip straight onto a cooling wrack. Peel off the tin and grease-proof paper and allow the cake to breath. Let it chill, give it a G&T.

- Turn the oven down to 160 C Fan, and allow it to adjust to the temperature required for the shortbread.


Method- Shortbread:

- Grease and line two baking sheets and set aside until needed.

- Put the butter and caster sugar into a bowl and cream together until light and fluffy.

- Add the cornflour and flour in and start to mix slowly. When the mixture comes together to resemble bread crumbs (like when you make pastry), start kneading the dough together using your hands. Knead until it comes together to form a smooth, pale dough.

- Roll this out on a very lightly floured surface, as you don't want to dry out the dough. Use a cutter to cut out your desired shapes and place onto a baking sheet.


- Pop in the oven for 12 minutes until light golden brown and darker around the edges.

- Leave to cool on the tray and sprinkle with sugar.


- Alternatively, dip in the chocolate ganache and leave to set before piping on the icing writing.


Method- Ganache:


 - Pour the cream into a pot and heat until just before boiling point. Throw in the butter and allow to melt in the heat.

- Tip in the crushed up chocolate and leave to melt in slightly before stirring. Change to a whisk and whisk the chocolate until smooth and silky looking.

- Leave to set for around 20 minutes before dipping the cake slices and/ or shortbread in.


Cake:

- Put the cooled cake onto a chopping board and trim the edges to make the cake even. Cut into even squares and put back onto a cooling rack for a further 10 minutes to cool and stabilise a little more.


- Once completely cooled, using a fork, stab the little cakes in the center of their bases and dip into the ganache. Let the excess ganache drip and then place onto a cooling rack to set.


- Once set, pipe on the little heart shapes or whatever design you wish.


Icing:

- Dump all the icing sugar into a bowl.
- Add the water, a little at a time and mix until a thick, but workable paste.
- Put into a piping bag and pipe.


Shortbread:

- Use the shortbread you left plain and dip it into the chocolate ganache. Leave to drip, as you did for the cakes and put onto a cooling rack.

- Leave to set and then once stable enough, pipe on the icing writing or again whatever message or design you want.


And that's that! Hope you enjoyed this, as I really enjoyed experimenting with different recipes and ways to decorate them?

Thanks again and I'll be back, in the least ominous way possible...

Ciara

Saturday 16 January 2016

Chickpea and Chorizo Stew


Sup all!

I'm trying to throw some relaxing vibes out there, hence my more chilled-back greeting today. It's Saturday; the day of fluffy socks, DVD's and farting about the house. (when I say 'farting' I don't mean passing wind, I mean, pottering, chilling, faffing around- relaxing in general)

Today, I got up, did some paperwork and walked the dog (who then decided she didn't like the cold on her paws. She then proceeded to sniff trees for around 10 minutes, knowing very well I'd get fed up and go back). I then searched recipes online; looking for something full of flavour, had depth and intensity for dinner. As it is a cold, wet and icy day, I wanted something warm, spicy and terrifically full of flavour!

So, I was negotiating the slippery pavements on route to the shops, when I see mother driving up the road. She then offers me a lift, much to my delight, as the realisation of my poor shoe choice was weighing me down and literally making me slip.

This is a Nigel Slater recipe. I have made some changes to suit my tastes and to make it more unique to me. 

The equipment you will need are:

- Chopping board and a knife
- Frying pan and pot
- Spatula 

Ingredients needed; this recipe said it served 2 people, but after making it, I think it would serve 4:


- 2-3 tbsp of Oil; I used Rapeseed as I like the taste
- 2 Large Onions; chopped into small chunks
- 4 cloves of Garlic; I used 6 as they weren't very big and added a little garlic powder
- 3 Chorizo sausages; I bought 150g packs of already chopped chorizo. 

I know, I know, sounds lazy. But you just call me when you are struggling to peel and chop 3 whole chorizo sausages and cook it all within 40 minutes; which I did. Why get messy with meat, when you can buy it prepared for the same price and less mess around the kitchen?

- 1 glass of White Wine; whatever you have. I sneaked some of mother's Sauvignon, so I think this will taste good...

- 1 tin of chopped tomatoes; with juice 
- 2 x 400g tins of Chickpeas; without the juice 

I then added:

- 2 tsp Paprika; sweet with a little heat
- 1/2 tsp Garlic granules 
- 1 Red Pepper; chopped into small chunks 

I left out the dried chillies that the recipe called for, as mother doesn't like heat, what can I say, the woman can't hack it.

For my serving, as I like heat, I added a few dashes of Tabasco to give it more heat.

Method:

- What you want to do first is heat the oil in a pan and warm it through. 


- Add in the onion and cook it slowly until it softens through and goes slightly translucent.


- Add the chopped garlic and peppers and cook them until softened as well. 


After all of these are softened and cooked through, chuck them into a deep pot, that has been heating on low. Use the pan that the onion, garlic and peppers were cooked in and pop the chorizo in.


- Cook the sliced chorizo in the pan with the tiniest dribble of oil. I found that a little of the Rapeseed oil, invited the natural oils of the chorizo out. The recipe said to boil the chorizo within the stew, but I decided to fry it slightly before, as I wanted a really intense flavour and that meant making the chorizo a little crispier by frying it, using its own oils and a little added oil. 


The chorizo oil will give this stew added depth, which is another thing I wanted.

- Whilst the chorizo is cooking and infusing, add the chickpeas and tinned tomatoes into the pot, along with the onion, garlic and peppers.


- To help the flavours mix and infuse together, pour in the wine and I added a glass of water as well to cut down the alcohol flavour, as I didn't want it. All I wanted from the wine was aroma and liquid to make the stew lighter.


- Chuck in the chorizo; oil and all, and allow the whole thing to infuse and intensify in flavour and depth.


- Season with a little salt and pepper if needed. Serve with a slice of crusty bread.

You could add some chopped parsley on top of this or some creme fraiche?


That is it- I hope you try this as it is really delicious! 

Have a lovely evening all!

Till next time...

Ciara

Thursday 7 January 2016

Victoria Sponge Cake... with a Twist


Good evening all!

So I'm back again, which is both as promised and inevitable as this is my blog; so who else would it be?

Today I wanted to strike another bake off my Baking Aspirations List, and even though this bake wasn't on my list, number 30 did say 'whatever else I fancy' ... or something along those lines? So I made a Victoria sponge, but not in the same traditional way that you would normally see it.

I was watching James Martin's Home Comforts show the other day and he made a Victoria sponge. I rather liked the look of it, so thought I would give it a go, but put my own twist on it.

Victoria sponge cakes are special to me, for the simple fact that a Victoria sponge cake was the first cake I ever made. I know- EXCITING. I was all of 10 years old. It was a rainy day... no cloudy day... or was it a rainy day? The weather really isn't relevant to this story. Anyway, the cousins were coming round (I forget why) and I had a friend over. We were baking together and it was fun, almost. I don't really enjoy having others in the kitchen with me when I am baking. It is me and the ingredients, there is no room for anyone else. (When in reality, the space of our kitchen could accommodate;

- A hyper dog
- A dancing mother
- A cynical sister who claims she is in there for 'moral support'- that is her excuse for not wanting to help, not wanting to clean, or even get up. In fact the only reason she was in there was to eat what was being made.
- A wagon, filled with presents
- All the cousins, of which there are 6. Laughing, speaking loudly and smiling
- A dining table with 4 large chairs
- And a few other things...

So yeah, my only excuse is that I don't like other people in the kitchen when I'm baking. It makes for too much stress and irritation frankly.

That is a long-winded way to explain how a Victoria sponge was the first thing I baked.

I then iced the cake and to this day, a Victoria sponge baked in a loaf tin and topped with pink icing takes me right back to 10 year old Ciara.

The equipment that you'll need for this cake is:

- 2 x 20cm Cake Tins
- Baking Paper
- Mixer or something similar. If the butter is soft enough, you could use a wooden spoon
- A spatula or something to scrape out the bowl with
- A piping bag, or you could always spread the cream on with a spoon or knife
- A sieve
- A pallet knife

The ingredients that you will need to make the cake and decorate the cake are:


For the Cake:

- 330g Butter, softened

(If not soft enough, pop it in a microwave safe bowl and blast it for 30 seconds. If you don't have a microwave, you should leave the butter out at room temperature until it is soft enough. This really doesn't work with hard butter- that is where the irritation comes in)


- 330g Caster Sugar


- 6 Eggs


- 330g Self- raising flour


Method:

- Grease two cake tins with butter and then line them with grease proof. This doesn't have to be super accurate and exactly line up around the rim. I just have a little piece in the middle, as that is the main part that could stick to the tin, and if it does, i'm not going to lie, it is depressing when/if it happens.


- Pre-heat the oven to 170 C.


- Measure out the softened butter and cream it until smooth.


- Add the sugar and mix until creamed, pale and fluffy looking.


- Chuck in the eggs all at once and whisk until frothed up, incorporated and a pale, yellow colour.

Stages of Egg incorporation:


- Add the flour and mix. Add a little dribble of milk if the mixture looks thicker than desired. I at this point  normally do add milk anyway, as I feel it ensures that the cake will stay moist (ugh, loath that word).

The stages of the cake making:


- Portion out the batter into the two cake tins and smooth out with a pallet knife, this will level off the cake.


- Throw the cakes in the oven (not literally) and bake for 25- 30 minutes, or until risen, golden brown and bouncy.


- Wrap a tea towel around a cooling tray and tip the cakes, top first onto this to cool. Peel off the tin and grease proof to allow the steam to escape and the cake to cool.

(The reason behind wrapping the cooling rack in a tea towel is so that when you're cooling the cakes, your cakes cool without sticking to the grooves of the wire rack. Meaning it will stay level, flat and not have any rims and scores on the surface- hurting presentation. I picked up this trick after watching a cooking programme)

For the Decoration:


- 6 Strawberries (for topping)
- 6 Blueberries (for topping)
- 7 Raspberries (for topping)
- 20g Icing Sugar (for topping)

- Leftover Blueberries (for middle)
- Leftover Raspberries (for middle)
- 300ml Whipping Cream (for middle)


Method:

- When the cakes are cool, move the bottom half onto a plate or whatever you are planning on presenting it on.

- Whisk the cream until thick. Thick enough to hold its shape, but not so thick that you are nearly at the butter stage and is looks all curdled.


- Plop the cream onto the middle of the bottom half of the cake. I piped it on as it was neater and easier. Don't spread the cream too close to the edge or it will spill out the sides... unless you like that look, in which case, go right ahead.


- Drop the fruit on top of the cream in whatever pattern you like. Nobody is going to see this part, so I was scruffy with it. Not in the sense that I overloaded on fruit on one half and was stingy on the other, but that I didn't have each piece in a specific part. It just isn't worth it.


- Dust the top half of the cake with icing sugar. I did this over the sink, as I had just cleaned the kitchen prior to starting and didn't feel like messing the whole kitchen up with the sugar.

- Position the reserved fruit on top of the cake in whatever pattern you so desire.


That is the cake done and dusted. I really enjoyed making this cake as I feel the more traditional Victoria Sponge is cream and raspberry or strawberry jam, whereas, I just have the cream and whole fresh fruit in the cake.

Alternatively, to add an extra dimension, you could add a little lemon curd to give it a zing, or a fruit coulis.

I hope you enjoyed this as much as I did?

Be back soon. Thanks again

Ciara


P.s. At the risk of putting too many photos up, here is a pictorial guide on how I spread on icings with the pallet knife; hopefully it comes across...


Okay, I'll stop now.... :)