

This morning I got up and ate breakfast. Now, those who know me well, will know I don't do breakfast. Yes, yes I know all about starting the day off right and kick starting your metabolism, but it just ain't me... My brain says 'eat!', my stomach say 'nah mate, call again in around 2-3 hours'. None of this has any relevance to what I baked or why I bake it. I just felt like sharing. Sharing is supposedly caring, as that purple... dinosaur told us? Suddenly couldn't remember as to whether Barney was a bear or a dinosaur...
I had another creative urge today and wanted to test out some new ideas and techniques. So I baked shortbread, chocolate covered shortbread and mini chocolate cakes. Chocolate themed you could say.
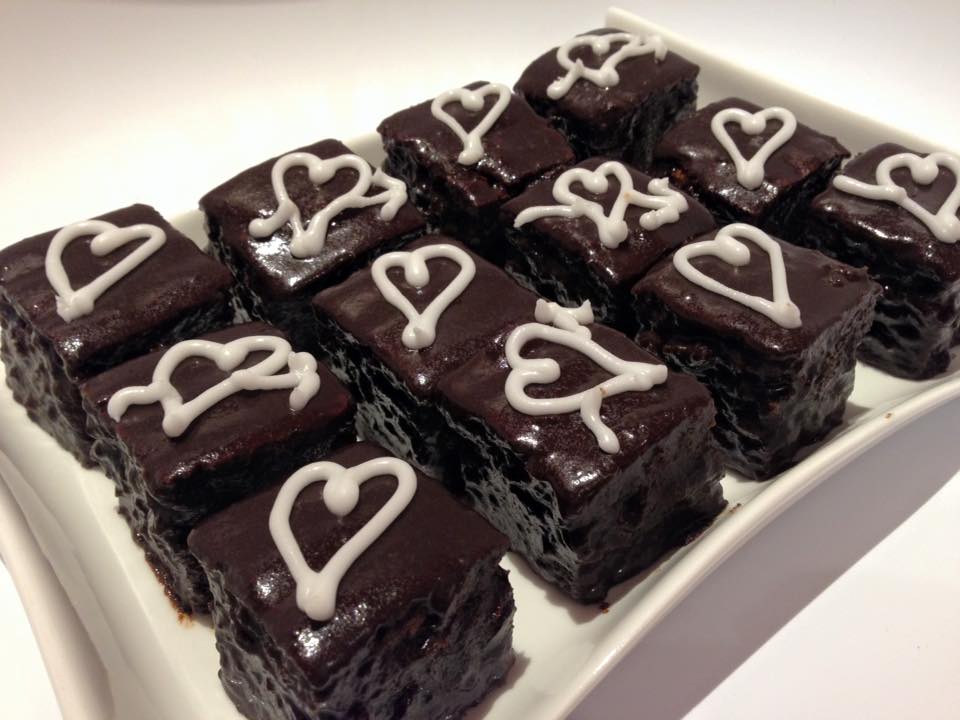
My first reason for baking was to make something sweet with Valentines in mind. My second was to find an easier way to make fondant fancies. You see, my mini chocolate cakes are my own take on a fondant fancy. For I feel they are a slight faff to make in a small, home kitchen, like my own. What with the cutting into tiny equal sizes, then covering with buttercream all over and icing them. With large, industrial machines, sure it wouldn't be a bother now would it? But I have to make do with what I have. My method experiments with skipping the buttercream and simply dipping the individual cakes into thickened ganache.
So potter into the kitchen I did, to put on some 80's music and an apron and then I was ready to start. I started with the small cakes, as they baked for longer and at a higher temperature than the shortbread. Once the cake was baked (before cutting), I cooled it and popped the shortbread into the oven. Then made the ganache.
The equipment you'll need:
(1)
- 1 Rectangular cake tin
- Grease-proof paper
- Mixer or bowl and hand mixer
- Weighing scales
- Palette knife
- Skewer
- Cooling rack
- Knife
- Spatula
- Fork
(2)
- 2 Baking trays
- Cooling rack
- Grease-proof paper
- Star Cookie cutter, or whatever shape you wish
- Rolling pin
- Weighing scales
- Mixer or bowl and your hands
(3)
- 1 Pot
- Weighing scales
- Spatula
(4)
- Piping bag, fitted with a small tip, for piping writing
The ingredients you'll need are:
1) For the Cake:

- 220g Butter, soft enough to cream easily
- 220g Caster Sugar
- 4 Eggs
- 220g Self-Raising Flour
- 1 pack of Chocolate Chips, melted
2) For the Shortbread:


Every recipe changes and you might have a really good one.
I would recommend trying a few as I have, that is why I haven't listed ingredients.
3) For the Ganache:
300ml Double Cream
300g Dark Chocolate
10g Butter
4) Icing Writing:

- 100g Icing Sugar
- 4 tbsp Water (or enough to make a thick paste, that can be piped)
Method- Cake:
- Beat the butter in a mixer, until smooth and creamed. Once it has reached this stage, add the sugar and starting slowly, whisk in to create an airy and light mixture.

- Add in all the eggs at once and whisk on a high speed until frothy, light and pale.


- Dump in all the flour and chocolate and mix until a pale chocolate colour and there are no lumps left.

- Spread this evenly into the prepared cake tin and bake for 30-35 minutes at 170 C in a Fan Assisted oven (non-fan 190 C or Gas mark 5) but you know your appliances best, so you decide :) until golden brown, risen and fluffy. When you insert a skewer, it should come out clean, with no bits. Plus, I feel a good way to tell if the cake is done, is when you are inserting the skewer, can you feel it breaking through the crumbs that are beginning to form? If it is smooth and you can't feel anything against the skewer, it is most likely not done yet.

- Take this out of the oven and tip straight onto a cooling wrack. Peel off the tin and grease-proof paper and allow the cake to breath. Let it chill, give it a G&T.
- Turn the oven down to 160 C Fan, and allow it to adjust to the temperature required for the shortbread.
Method- Shortbread:
- Grease and line two baking sheets and set aside until needed.
- Put the butter and caster sugar into a bowl and cream together until light and fluffy.
- Add the cornflour and flour in and start to mix slowly. When the mixture comes together to resemble bread crumbs (like when you make pastry), start kneading the dough together using your hands. Knead until it comes together to form a smooth, pale dough.
- Roll this out on a very lightly floured surface, as you don't want to dry out the dough. Use a cutter to cut out your desired shapes and place onto a baking sheet.

- Pop in the oven for 12 minutes until light golden brown and darker around the edges.
- Leave to cool on the tray and sprinkle with sugar.

- Alternatively, dip in the chocolate ganache and leave to set before piping on the icing writing.
Method- Ganache:

- Pour the cream into a pot and heat until just before boiling point. Throw in the butter and allow to melt in the heat.
- Tip in the crushed up chocolate and leave to melt in slightly before stirring. Change to a whisk and whisk the chocolate until smooth and silky looking.
- Leave to set for around 20 minutes before dipping the cake slices and/ or shortbread in.
Cake:
- Put the cooled cake onto a chopping board and trim the edges to make the cake even. Cut into even squares and put back onto a cooling rack for a further 10 minutes to cool and stabilise a little more.

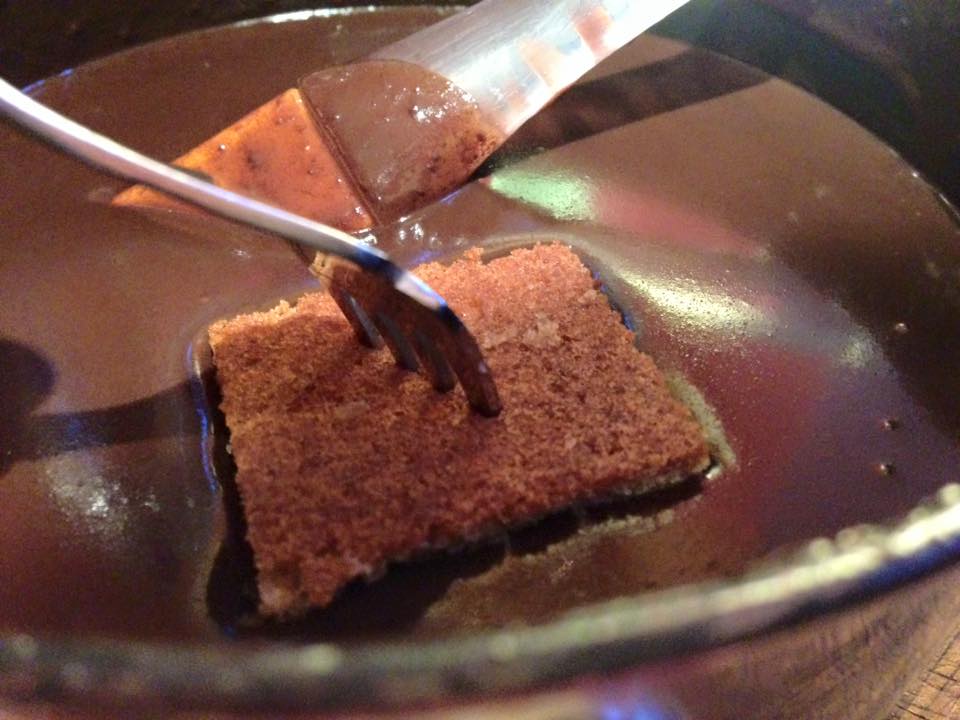
- Once completely cooled, using a fork, stab the little cakes in the center of their bases and dip into the ganache. Let the excess ganache drip and then place onto a cooling rack to set.

- Once set, pipe on the little heart shapes or whatever design you wish.
Icing:
- Dump all the icing sugar into a bowl.
- Add the water, a little at a time and mix until a thick, but workable paste.
- Put into a piping bag and pipe.
Shortbread:
- Use the shortbread you left plain and dip it into the chocolate ganache. Leave to drip, as you did for the cakes and put onto a cooling rack.
- Leave to set and then once stable enough, pipe on the icing writing or again whatever message or design you want.


And that's that! Hope you enjoyed this, as I really enjoyed experimenting with different recipes and ways to decorate them?
Thanks again and I'll be back, in the least ominous way possible...
Ciara
No comments:
Post a Comment